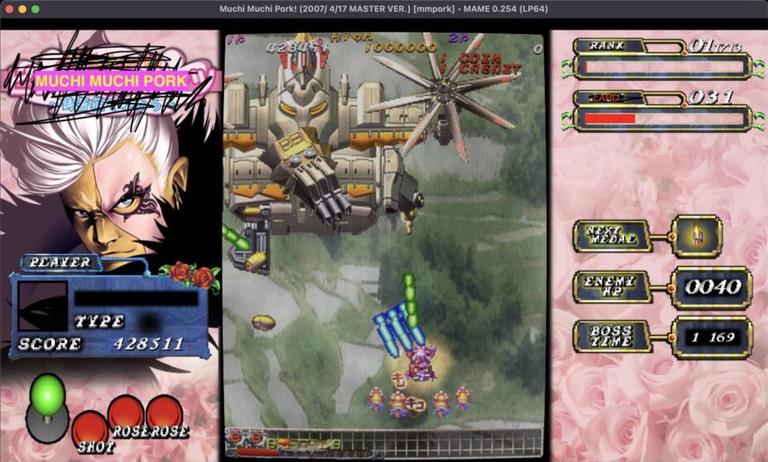
Muchi Muchi Pork MAME Overlay
Shmups are often oriented vertically, meaning their arcade cabinets have a monitor that’s rotated 90 degrees so that it’s taller than it is wide. It’s just a regular monitor on it’s side. Other arcade games are like this too: Donkey Kong, Pac-Man, etc. When you run these games in an emulator, you’ll have tons of excess screen space on the sides of the game that are just blank. The M2 ShotTriggers series, which ports shmups to modern platforms like PS4 and Switch, started using that extra space to provide all kinds of extra game state that usually isn’t visible for the player, which has been a great innovation.
Some folks in the shmup community were influenced by M2 and started making MAME Overlays for certain games. One game was ‘Pink Sweets’ which is a game I totally don’t understand or like, BUT it runs on the same hardware and engine as one my favorites: Muchi Muchi Pork. So I took the ‘Pink Sweets’ overlay tried to make it work for MMP. It’s the same hardware and engine but the memory locations of things are different, so I used the MAME Debugger to find where certain values like rank, lard meter, score, and medal value live. These were pretty easy to figure out since they’re just static values.
These values are handy, but the really handy stuff would have been to have the boss HP and timer so you know when to blow up a boss and get the most medals. These are significantly harder and I couldn’t figure them out on my own, so I got in touch with the folks who made some of these overlays and asked for help. They were super nice and set me up with some Ghidra projects that they had used for other overlays and invited me to a reverse engineering Discord. Ghidra is a reverse engineering tool, and let me just say that I was waaaayyy out of my depths here. Staring at a bunch of SH3 assembly was hopeless, but I asked for help and they gave pointers which I used to somewhat disassemble the boss logic and find where different values, namely HP and the timers live for each phase of the boss. MMP is a little different than Pink Sweets in that the bosses are usually made up of different parts that you blow up per phase, so the boss logic was quite different. I was able to figure out most of the boss HPs and some of the timers. I might find more over time.
I left the artwork unchanged from the Pink Sweets overlay, other than scribbling out the ‘Pink Sweets’ logo and putting text over it and making a cheap lard meter. I got in touch with the person that made the Pink Sweets art and maybe there’ll be some better art sometime.
The code lives in this repo. To use it, go to releases and download the latest mmpork.zip which you put in your artwork directory for MAME. Then start MAME like this:
./mame mmpork -plugin layout
and you should be good to go. It even works on a Steam Deck!
I also created a repo for some LUA scripts that I wrote to help figure things out and dump out the enemy table. That’s available here.
This post is part of a 3-part series:
- MAME Debugger Intro
- MAME Lua Scripting
- You are here: Muchi Muchi Pork MAME Overlay
Appendix A: Boss logic
Here’s a comment from the main file that contains the layout logic that explains a little about how the boss logic works.
-- Muchi Muchi Pork bosses can have multiple phases, and multiple parts that you have to destroy per phase.
-- For example, the stage one BOSSES entry looks like this:
-- [80] = {[0] = {4,160,{[1] = 3600}}, ['part_ids_for_phase'] = {[1] = {22, 0}} },
-- Let's break down what this means.
-- The "key" of BOSSES is the enemy_type. Every enemy in MMP has an enemy_type, which for the stage one boss is "80"
-- So for "80", we want to pull some data off part_id "0", which is why we've got this record:
-- [0] = {4,160,{[1] = 3600}}
-- This is from where we'll pull timer and phase data.
-- TODO: Timer stuff is not figured out yet for MMP, these are just placeholders from Pink Sweets.
-- Then, 'part_ids_for_phase' will tell you which part_ids to pull hitpoint information from:
-- ['part_ids_for_phase'] = {[1] = {22, 0}}
-- This means for phase 1, we first want to pull hitpoint information off part_id "22", which is
-- that big turret in the middle of the boss. Until that's destroyed, the main part can't take damage.
-- Once "22" is destroyed we want to pull hitpoints off part_id "0".
-- NOTE: Phases tend to be odd numbers, which is why we see "[1]", "[3]", and "[5]" in 'part_ids_for_phase'.